Making a Digitally Accessible Document Using Checkboxes in Word
Clearly, I do not know how to design a Web page. I apologize. My to-do list never shrinks.
Just Straight to the Files
Deficiency Notice - Civil Case.dotm (36.33 KB)
Delinquency Findings of Fact.dotm (40.5 KB)
Delinquency Order for Continued Detention.dotm (39.52 KB)
This document describes two special features that make the magic work: a pair of macros and a custom character-spacing style.
First, save your own template as a *.dotm file. Remember: store your templates in the Custom Office Templates folder within your Documents folder. If you like to organize, you can create subfolders within your templates folder.
Tip: To edit your template itself, in Windows File Explorer, right-click the template and choose Open. To create a new document based on the template, double-click on it in File Explorer, or right-click and choose New.
Spacing for Checkboxes
I personally found it necessary to have some space between the checkbox and the text. It is, of course, not necessary at all. My macro coding skills are not strong enough for me to figure out how to remove the checkbox plus any trailing spaces in one step; it has to happen in two passes. Word's find-and-replace feature cannot search for checkboxes.
To solve this, I use a custom character style, Checkbox Spacer, to insert space after the checkbox. The checkbox itself is all that gets the style applied to it.
This approach has one drawback: if a user starts typing immediately after the checkbox, the text will pick up the character spacing that is intended for just the checkbox. The user must select the affected text (but not the entire paragraph) and press Ctrl+Space to return to the default paragraph style.
Anything left in the Checkbox Spacer style will disappear when the user opts to hide the checkboxes and unchecked matter. Deleting the checkboxes and unchecked material will return any spaced text to normal, because the macro deletes the style from the document.
If you can live with your checkboxes right next to the text following them, then skip this extra work.
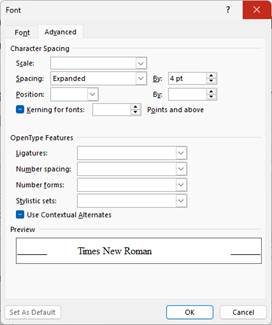
Otherwise, create a character style named "Checkbox Spacer" without the quotation marks. Click on Format, then Font, and go to the Advanced tab. Set Spacing to Expanded by, say, 4 pt. If you choose to use a different name for the style, edit the macro accordingly where it reads "Checkbox Spacer".
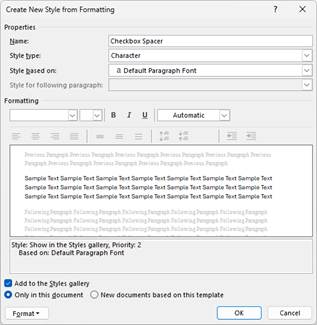
Click OK to return to your form.
Apply that Checkbox Spacer style to each of your checkboxes to pad their right sides out a bit. Again, if your form text next to it starts spreading out too, select the text and press Ctrl+Space.
Caution!
The included macros hide or delete the entire paragraph a checkbox is in.
Do not use checkboxes to select options like ☐ 30 ☐ 60 ☐ 90 ☐ 180 days in the middle of a paragraph. Use a combo box content control or a drop-down list content control. (A combo box lists choices but allows the user to enter different text; a drop-down restricts the user to the given choices.)
Copying the Macros
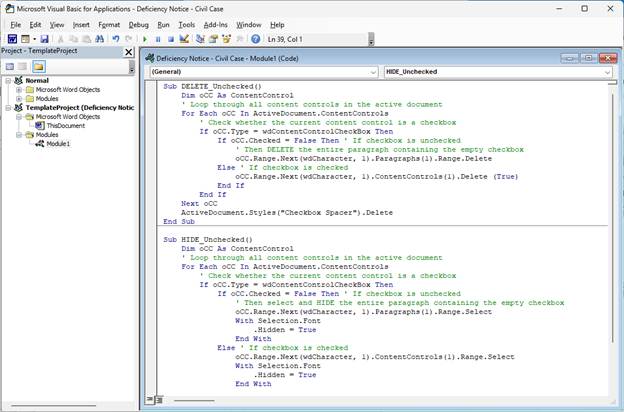
The code for the two macros follows under the next heading, "The Macro Code." The macro (that is, the Sub) named "DELETE_Unchecked" will delete each paragraph that has an unchecked box and all checkboxes. The macro named "HIDE_Unchecked" merely hides the unchecked paragraphs and all checkboxes.
Hiding allows a reviewer to see any missing options. A reviewer can use the Show/Hide tool to toggle hidden text. (Those who work with the pilcrow (¶) showing at the end of each paragraph may struggle to notice the faint indication that the HIDE_Unchecked macro worked. Toggle Show/Hide to see the effect.)
Your form should be its own template with macros enabled; that is, it should be saved as a *.dotm file. Copy the code below under The Macro Code. Note: It can be easy to add the macro code to the wrong document in the VBA editor. For the sake of simplicity, close all Word documents except for the sole template you are editing.
Press Alt+F11 to open the VBA Editor. By default, you will see in the left pane both the Normal template and your custom template listed. Ignore Normal.

Select your custom template and click on Insert, Module. Paste the macro code below in the pane that appears. Once done, you may close that Visual Basic for Applications window; there is no Save command in that window. You will save the code when you save your template.
The Macro Code
Macro code begins.
Sub DELETE_Unchecked()
    Dim oCC As ContentControl
    ' Loop through all content controls in the active document
    For Each oCC In ActiveDocument.ContentControls
        ' Check whether the current content control is a checkbox
        If oCC.Type = wdContentControlCheckBox Then
            If oCC.Checked = False Then ' If checkbox is unchecked
                ' Then DELETE the entire paragraph containing the empty checkbox
                oCC.Range.Next(wdCharacter, 1).Paragraphs(1).Range.Delete
            Else ' If checkbox is checked
                oCC.Range.Next(wdCharacter, 1).ContentControls(1).Delete (True)
            End If
        End If
    Next oCC
    ActiveDocument.Styles("Checkbox Spacer").Delete
End Sub

Sub HIDE_Unchecked()
    Dim oCC As ContentControl
    ' Loop through all content controls in the active document
    For Each oCC In ActiveDocument.ContentControls
        ' Check whether the current content control is a checkbox
        If oCC.Type = wdContentControlCheckBox Then
            If oCC.Checked = False Then ' If checkbox is unchecked
                ' Then select and HIDE the entire paragraph containing the empty checkbox
                oCC.Range.Next(wdCharacter, 1).Paragraphs(1).Range.Select
                With Selection.Font
                    .Hidden = True
                End With
            Else ' If checkbox is checked
                oCC.Range.Next(wdCharacter, 1).ContentControls(1).Range.Select
                With Selection.Font
                    .Hidden = True
                End With
            End If
        End If
    Next oCC
End Sub
Macro code ends.
Once the code has been pasted, you may close the Microsoft Visual Basic for Applications window. Promptly save your template.
Adding the macros to buttons in the template
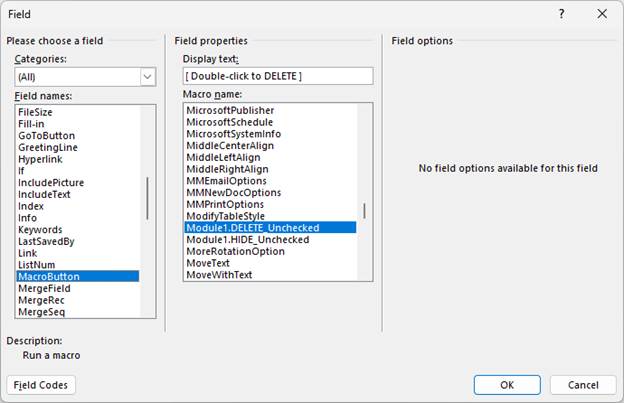
The double-click forms that are shown in the sample document below and that are useable in the accompanying files are Word field codes. To insert these codes:
1. Position your insertion point within your text where you want the prompt to appear.
2. On the Insert tab of the ribbon, choose Quick Parts, then Field...
3. In Field names, choose MacroButton.
4. In the Field properties pane, for Display text, type the text to be displayed.
5. Set Macro name to the name of the macro to be executed. Internal Word commands appear and may be used. Macros you have added to the template will appear as well; they may appear in the list prefaced by TemplateProject or Module1.
6. Click OK.
Repeat for each button you want displayed. Do not forget to set your display text, or you will have an invisible button. If that happens, press Alt+F9 to expose the fields so you can edit your invisible buttons.
Word automatically wraps your prompt text in quotation marks. If you wish, you may very carefully remove them. To do so:
1. Press Alt+F9 to toggle all fields in the document.
2. Delete only the first and last quotation mark.
3. By default, all field codes have a space after the opening brace and before the closing brace. I have been successful so far with removing the final space before the closing brace for the sake of appearance. Your mileage may vary.
4. Press Alt+F9 to toggle your fields back to normal display.
5. Save and close your template.
Test it out
Create a new document from your template and ensure you are getting the results you expect. Sample document follows - not that you can do anything with it, as it is merely static text.
STATE OF MINNESOTA DISTRICT COURT
COUNTY OF Select county FIFTH JUDICIAL DISTRICT
Deficiency Notice Civil Case
District Court File Number Enter file number
In re: Enter file information
Rejection of Documents (Rule of Civil Procedure 5.04):
☐Documents submitted to the wrong court for filing.
☐Incorrect court file number.
☐No or insufficient filing fee. The fee to file this case is $Enter amount.
☐Enter any other reasons
Select courthouse
Make checks for payment of fees to Court Administrator. Please do not mail cash. We will process this matter for you when any deficiencies as noted above have been resolved. For forms and instructions refer to the Minnesota Judicial Branch website https://mncourts.gov/getforms.
Dated: Select or enter date
5th District Civil Process Team
☐Preparer: Do not check this checkbox or any of the following checkboxes.
☐Preparer: as the author of this document.
☐Preparer: or all unchecked paragraphs and all checkboxes. Use Hide if you want to allow another Word user to double-check your choices.